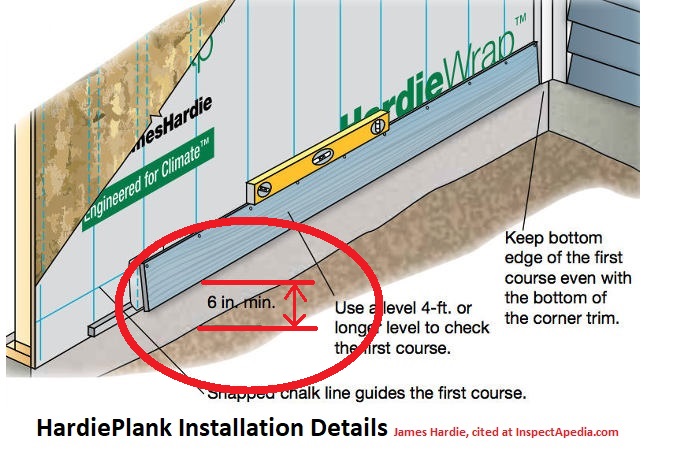
How High To Start First Course Of Siding

Hardie Plank Install Instructions Figure 1 20 Fiber Cement Siding Standard Nailing Pattern C Wiley Cement Siding Fiber Cement Siding Siding

Materials For Board And Batten Siding Board And Batten Siding Board And Batten Exterior Siding Cost

Vinyl Siding Tips Vinyl Siding Installation Vinyl Siding Installing Siding

All About Rainscreens Installing Siding Rustic Basement House Cladding

Before And After Siding Replacement With Alside Mystic Blue Vinyl Siding Blue Vinyl Siding Blue Siding Exterior House Renovation

Board N Batten Home Siding Ct Blue Siding Blue Vinyl Siding House Siding

Nail a piece of plywood about 3 5 inches 89 mm thick along the top of the chalk line this will hold out the bottom of the first row of siding.
How high to start first course of siding.

Certainteed Cedar Impressions Polymer Shake And Shingle Siding Can Be Painted With Sherman Willi Siding Colors For Houses Exterior Siding Colors Vinyl House

Check Out This Installation Of Durable Aluminum Exterior Shutters With Raised Panels On The Bottom And Louvers On T Shutters Exterior House Design House Styles

Certainteed Siding Monogram Light Maple Colonial White Yellow House Exterior House Paint Exterior Siding Styles

Benjaminmoorewhalegray Exteriorideas Hardieplank Bricksteps Paintcolor Exteriors Exterior House Paint Exterior Craftsman Farmhouse Exterior House Color

Diamond Kote Prefinishing Exterior Siding Colors Vinyl Siding Colors Siding Colors
Stone Look Vinyl Siding Buff Gray Castle Rock Siding Colors Color Inspiration Home D House Paint Exterior Exterior House Siding Exterior Paint Colors For House

Pin By Printing House On Outdoor Gray House Exterior Exterior House Siding Siding Colors For Houses

Q Fine Homebuilding Has Featured Many Houses Over The Years With Decorative Patterns Woven Into The Shingle Cou Cedar Shingles Cedar Shingle Siding Cedar Roof

Tandoshake Rough Sawn Cedar Siding Dual Course Tando Cedar Siding Vinyl Cedar Shake Siding Cedar Shake Siding

James Hardie Board And Batten Siding Colorplus Arctic White Manchester 636 734 9299 Exterior House Siding Farmhouse Exterior House Exterior

Vinyl Siding Aluminum Soffit Fascia Hicksville Ohio Outdoor Remodel Vinyl Siding Vinyl Soffit
Vinyl Siding Inspection And Repair Guide Vinyl Siding Inspection Defects Diagnosis Repair Advice

Replace Aluminum Siding With Eco Friendly Wood Siding Exterior Siding Choices Aluminum Siding Wood Siding

Hardiepanel Vertical Siding In Cedarmill Texture Vertical Siding House Siding Hardie Board

White Siding Black Windows And Cedar Shakes Wow This Designer Knows What Looks Good Allmyfavorites White Shingle House White Siding House Exterior

Pin By James Hardie Building Products On Traditional Home Looks Hardie Siding Hardie Plank James Hardie Siding

Desert Brown Tuf Rib With Copper Penny Trim Looks Gorgeous On This Barn And Home House Exterior Metal Building Homes Metal Building Homes Cost

25th Roofing And Siding 2 Roofing Siding Roofing Diy
1

Front Doors That Welcome Spring In 2020 Exterior Doors Front Door Fiberglass Door

Foundation Details Guide Check Out Our Latest Guide To Residential Foundation Details Arc In 2020 Architecture Presentation Exterior Siding Architecture Details

Lifetime Architectural Shingles Mastic Certainteed Siding This Beautiful Home Is A Perfect Exa With Images Architectural Shingles House Exterior House Designs Exterior

Deep Blue Floral Custom Nike Elite Socks Fresh Elitesyou Can Find Nike Elites And More On Our Website Deep Blue Floral Custom Nike Elite Socks Fresh Elites With Images Facade

Greenlake Residence Traditional Exterior Craftsman Exterior House Paint Exterior Exterior Paint Colors For House
Source : pinterest.com
